


Introduction
Dental implants are artificial tooth roots that are placed surgically into the jawbone. They are usually made of titanium. Unlike dental bridges, implants do not rely on surrounding teeth for support, but rather anchor directly into the jawbone. They offer durable and natural-looking solutions for missing teeth, eventually restoring both function and aesthetics. The durability is long-lasting as implants fuse with the bone, providing a stable foundation for crowns, bridges, or dentures. This article discusses the types of dental implants in detail. Moreover, it explains each type’s procedure step by step. The author mentions nine major types of dental implants here.
1. Endosteal implant
An endosteal implant is the most common type of dental implant. The process involved surgery by directly placing the dental implant into the jawbone. This acts as artificial roots to hold replacement teeth, such as crowns, bridges, or dentures. The placement of endosteal implants consists of the following steps:
i. Initial Consultation and Tooth Extraction
- The dentist examines the patient’s health for diabetes or heart issues, etc., then evaluates the jawbone with the help of X-rays or 3D scans.
- The patient will require a tooth extraction if a damaged tooth is present. After removing the damaged tooth, the patient may need some healing time before proceeding to implant placement
ii. Bone Grafting & Implant Placement
- The dentist performs bone grafting if the jawbone is not thick or strong enough to support the implant. If so, healing can take some time.
- The surgeion inserts the endosteal implants surgically directly into the jawbone. They usually place a screw-shaped post made of titanium as the implant and then stitch the gum closed over it.
iii. Osseointegration
- The bone grows around the implant, anchoring it securely in place. The name of this process is osseointegration, which takes 3 to 6 months.
- The dentist temporarily covers the edentulous (missing tooth) space with a crown or denture.
iv. Abutment and Crown Placement
- After healing, the surgeion attahes abutment (a connector between the implant and the crown) through a minor surgery. Healing of gum tissues takes 1 to 2 weeks.
- Once the custom-made dental crown is ready, the dentist matches it with natural teeth and attaches it to the abutment, completing the restoration.
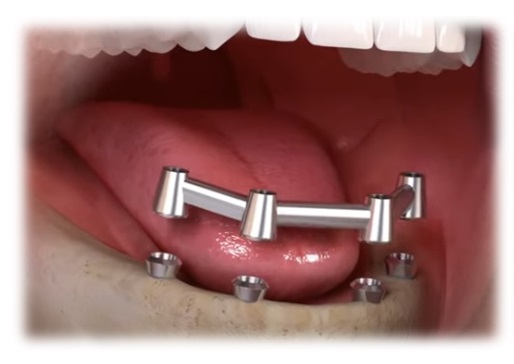
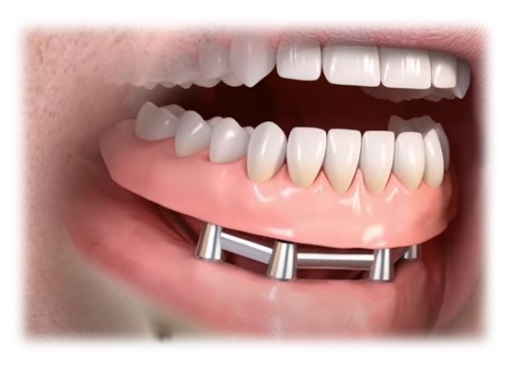
2. Subperiosteal Implants
Subperiosteal implant is helpful for those people who have lost all or most of their teeth in one jaw. This option is ideal when the jawbone lacks sufficient height or density for traditional implants, as it allows placement directly into the bone.. In such cases, the dentist rests the implants on top of the jawbone but underneath the gum tissue. A custom-made metal framework supports the artificial teeth, securing them in place upon the healing of surrounding gums. This procedure is a less invasive alternative to endosteal implants where a patient is unable to go with bone grafting. Below are three steps to perform subperiosteal implants:
i. Initial Consultation and Assessment
- The dentist evaluates bone structure and gum health with the help of X-rays or CT scans.
- Using traditional molds or digital scans, the dentist takes a custom impression of the jawbone that helps to create a custom metal framework that will fit snugly over the jawbone.
ii. Fabrication
After fabrication, the dental surgeon send the impression of the metal framework to the dental lab. The technicial makes a lightweight metal framework, usually from titanium.

iii. Placement
- The anesthesiest administers local anestheia or sedation to the patient before surgery. Afterward, the dentist makes an incision in the gum to expose the jawbone.
- Then they places tThe custom metal framework over the jawbone and sutures the gum tissue back over the framework, leaving small metal posts exposed above the gum line. These metal posts hold the prosthetic teeth later.
- The healing time is shorter than the endosteal implant because of no embedness of implant into the bone.


iv. Prosthetic Teeth and Follow-up
- the dental surgeon attaches the crowns or dentures to the exposed posts upon the healing.
- The dentist adjusts fitness, comfort, and aesthetics.
- The patient receives complete set of information regarding good oral hygiene and regular dental visits.
3. Zygomatic implants
Zygomatic implant is specially designed for the upper jaw (maxilla). It is anchored in the zygomatic bone (cheekbone), which is dense and strong, providing good support. This type is good in case when there is severe bone loss in maxilla and bone grafting might not be possible.

You can find complete details of the zygomatic implant steps here.
i. Initial Consultation
- The dentist examines the oral health of the patient and suggests advanced 3D imaging (CBCT scan) to evaluate the amount of bone loss in the maxilla and structure of the zygoma.
ii. Surgical Procedure
- The dental team often performs the procedure under general anesthesia or deep sedation, especially when planning to place multiple implants.
- The dentist makes an incision in the gum of the upper jaw to expose the maxilla and zygomatic bone. The surgeon angles and inserts a long implant, usually 30 to 55 mm, through the upper jaw (maxilla) into the cheekbone (zygoma) for secure anchorage. The dentist typically places 1 or 2 implants per side, depending on the case.
iii. Temporary Prosthesis Placement
- In many cases, the dentist places a temporary prosthesis (full set of upper teeth) on the same day, a process called immediate loading.
- The implants bond with the zygomatic bone in 3 to 6 months. Meanwhile, the dentist advises the patient to follow a soft diet and attend regular checkups.
iv. Permanent Prosthetic Attachment
- The custom-made permanent prosthetic fits upon the healing. The dentist carefully adjusts the prosthesis for bite alignment and aesthetics.
- The dentist advises the patient on oral hygiene and regular dental visits to monitor implant health and surrounding tissue.
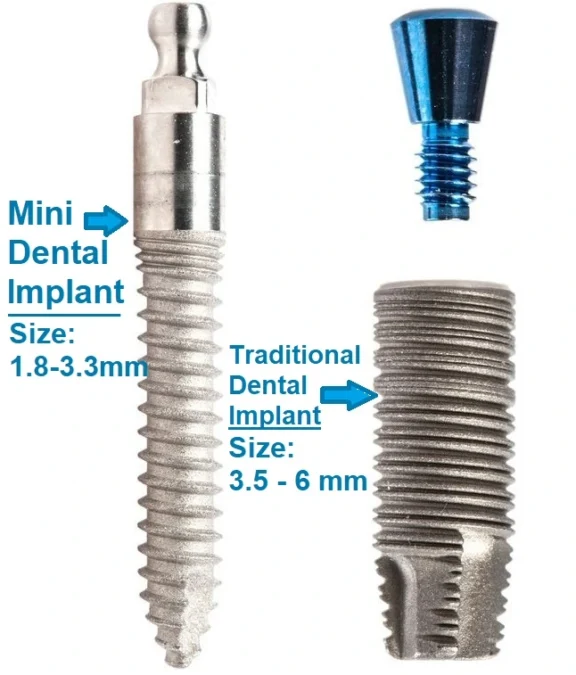
4. Mini Dental Implants
Mini dental implants are a good option for those who want less invasive, no bone grafting, and quicker healing time, making them a suitable option for those who have limited bone structure. They are smaller, narrower versions of traditional dental implants, typically used to stabilize dentures or replace small teeth. Mini dental implants consist of a single-piece titanium post with a ball shape supporting the prosthetic tooth or denture.

The process of mini dental implants involves three major steps.
i. Evaluation and Planning
- The dentist performs a complete oral examination to check bone density with the help of X-rays or 3D imaging.
- The surgeon develops a plan according to the patient’s needs, such as a single tooth, bridge, or denture support.
ii. Implant Placement
- Local anesthesia is developed to numb the area. The mini dental implant is less invasive, as there is no need to cut the gums.
- The dentist drills a small pilot hole directly into the jawbone for implant placement. Then, they screw a mini dental implant, usually 1.8 to 3.3 mm in size, into place using a handheld tool. Generally, they don’t need to use sutures.
iii. Attachment to Abutment and Follow-up
- The implant has a built-in ball-shaped head (abutment). The dentist attaches the crown or denture here. In many cases, they place the denture or crown immediately on the same day. Healing time can be a few days or a few weeks.
- The patient needs to be careful in eating soft foods for a few hours. Regular visits and checkups are essential for functioning well.
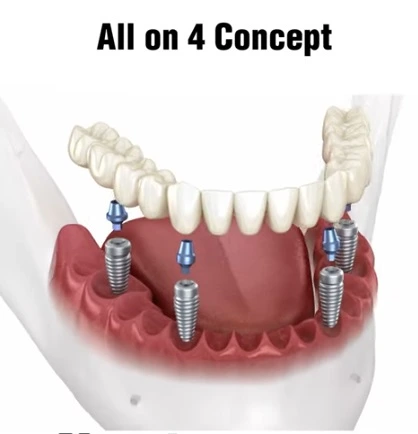
5. All-on-4 Implants
All-on-4 dental implants are the best option for those who lose most or all of their teeth. This procedure uses just four strategically placed implants in the jaw to support a full arch of fixed, aesthetically good teeth. Cost-effectiveness and minimal invasiveness are alternative options that differentiate this procedure from traditional dentures and full-mouth implants.
Below are three steps that describe how to replace all-on-4 dental implants:
i. Initial Consultation
- The dentist evaluates the oral health of the patient by checking bone quality by the help of X-rays or 3D CT scans.
- A plan is developed for prosthetic design and implant placement.
ii. Tooth Extraction
- The anaesthetist administers local anesthesia or sedation to make the procedure pain-free.
- The dentist removes any remaining damaged or unhealthy teeth and may reshape the jawbone to prepare for implant placement.
iii. Placement of Four Implants
- Once the healing is complete, the temporary denture is removed, and a custom-made permanent implant is positioned.
- The dentist adjusts fitness and aesthetics.
6. All-on-6 Implants
The steps of All-on-4 implants and All-on-6 implants are the same, but the main difference lies in the number of implants used and the level of support provided.

Below is a clear comparison between the two implants:
| Feature | All-on-4 Implants | All-on-6 Implants |
| No. of Implants Used | 4 implants per arch | 6 implants per arch |
| Patients with stronger bone and higher bite need | 2 front (vertical) + 2 back (angled) | 4 front (vertical) + 2 back (angled or straight) |
| Support Strength | Strong support, suitable for many patients | Greater support and stability for larger bridges |
| Bone Requirement | Designed for less bone, often avoids grafting | Requires more bone density |
| Durability & Load Support | Good for moderate chewing pressure | Better for higher biting force and longevity |
| Cost | Slightly lower overall cost | Slightly higher due to 2 extra implants |
| Ideal For | Patients with moderate bone loss | Patients with stronger bone and higher bite need |
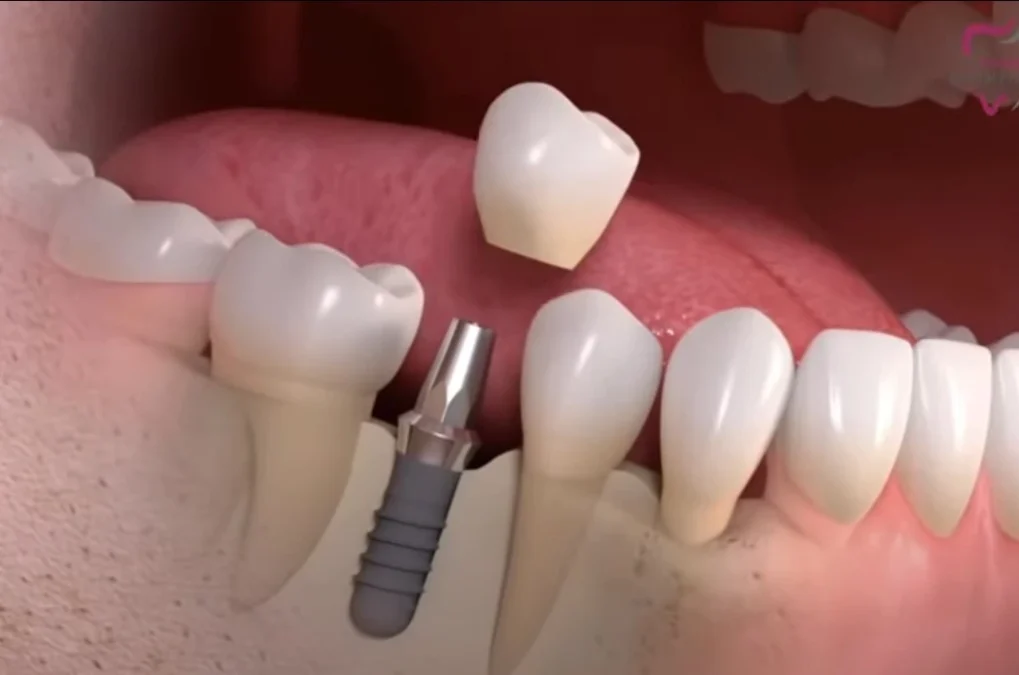
7. Single-Tooth Implant
A single-tooth implant is a lifelong solution used to replace a missing tooth without affecting surrounding teeth. The dentist surgically places the titanium post into the jawbone that acts as a root. A custom-made crown that mimics the look and function of a natural tooth. This procedure is very helpful in maintaining jawbone health, preserves facial structures, and restores full chewing ability with a natural appearance.
The following are steps involved in replaceing single-tooth implant:
i. Initial Consultation
- The dentist evaluates bone structure by taking X-rays and 3D scans.
- A treatment plan is developed to ensure the best placement for the implant.
ii. Tooth Extraction and Implant Placement
- The remaining tooth is carefully extracted, and the site is cleaned. In case of insufficient bone, grafting may be recommended.
iii. Implant Placement and Osseointegration
- The anaesthetist administers local anesthesia following small incision in the gum to access the jawbone.
- A hold is drilled into the bone and a titanium implant is screwed into place.
- The gum is sutured and the osseointegration process starts that take 3 to 6 months. During this time, the implant becomes a permanent part of jawbone.
iv. Placement of the Abutment
- Once the osseointegration process is complete, the gum is opened again, and an abutment (small connector piece) is attached to the implant.
- The abutment protrudes from the gum that provides a base for the crown.
- The dentist takes impressions to create a custom crown. The crown is placed on the abutment, completing the restoration.
v. Final Adjustments and Follow-up
- After crown placement, the dentist adjusts the crown and ensures comfort as well as alignment.
- Follow-up visits are scheduled to ensure proper functioning.
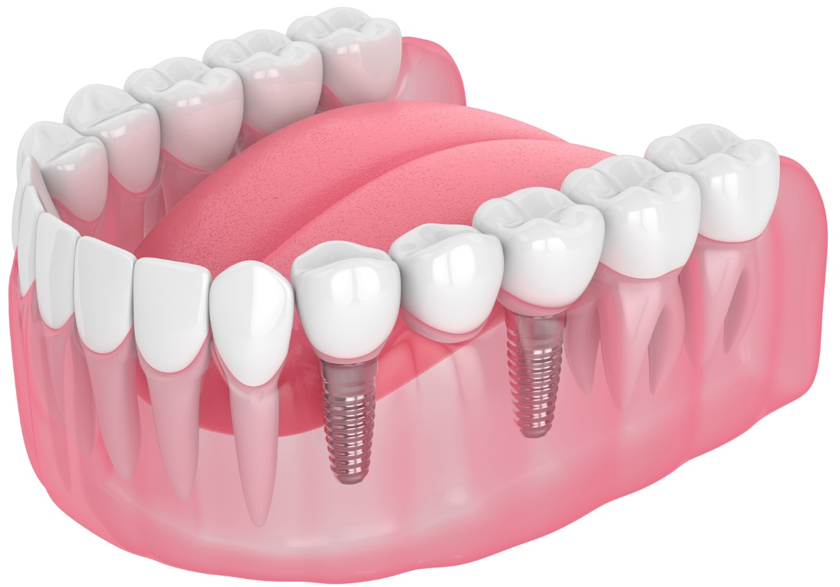
8. Implant-Supported Bridge
A unique method for replacing missing teeth is the implant-supported bridge, which combines the benefits of both dental bridges and dental implants. That’s why the name appears in both contexts.
In dental bridge, it typically uses natural teeth on either side of a gap as anchors. The dentist suspends the middle tooth (the pontic) between crowns that are cemented onto the neighboring teeth. However, this dental bridge procedure requires filing down the natural teeth, which then bear the full load.
In contrast, it uses dental implant as the support (anchors) usually, two implants support three or more artificial teeth like a traditional bridge but anchored in bone. The advantages are no damage to healthy teeth, more stability, and bone preservation.
A key difference of implant-supported bridges lies in their support system. Dentists place traditional bridges on adjacent natural teeth, which often need to be filed down. In contrast, dental implants rely on implanted posts, preserving the integrity of surrounding teeth and providing a long-lasting solution.
The following are the steps of Implant-supported bridge:
i. Initial Consultation and Planning
- The dentist evaluates oral health with the help of X-rays, 3D scans, and impressions.
- The dentist also simultaneously makes a treatment plan to decide the number of implants, their ideal positions, and the types of bridge etc. If jawbone is weak the surgeon suggests a bone grafting.
ii. Implant and Abutment placement
- The dental surgeion performs surgery to insert titanium dental implants into the jawbone that act as artificial roots to support bridge.
- Soon after the implants placement, the process of osteointegration starts in which the implants fuses with the jawbone. This process takes 3 to 6 months to ensure a strong and stable foundation.
- Once healing is complete, the dentist attaches abutment (connector) to the implants which support the bridge.
iii. Bridge Fabrication and Placement
- The dentist takes impressions to design a custom bridge that fits perfectly and fabricates the prosthetic teeth to match the natural look and bite.
- Once the custom bridge is ready, the dentist fixes it securely on to the abutments and completes the restoration.
- The dentist advises the patient on oral hygiene and regular checkups.
9. Implant-Supported Denture
Implant-supported denture is a type of overdenture that is anchored to dental implants instead of resting directly on the gums. The stability, comfort and chewing are comparativly more efficient. It is best for those who have lost most or all their teeth and want a more secure and durable solution. The denture is removable based on the number of implants placed.
The dental surgeon replaces the missing teeth through Implant-supported denture through following steps:
i. Initial Consultation and Treatment Planning
- The dentist examines the oral health of the patient with the help of X-rays and 3D scans.
- The dental surgeon determines in a plan the number of implants require (usually 2 to 6 per arch) and some cases recommend bone grafting.
ii. Implant Placement
- The anaesthetist administers local anesthesia, subsequently places places dental implants surgically into the jawbone.
- The osseointegration process starts soon after the surgery and the implant integrate with the jawbone to form a strong base for the denture. This process takes 3 to 6 months.
iii. Abutment Attachment and Denture Fabrication
- Once the healing process is complete, the abutments (connectors) are attached to the implants for denture support.
- The dentist takes the impression for creation of custom denture that attaches to the implants. The adjustment and fitting are satisfactorily performed to function properly.
- The placement of denture can be performed into two manners: snapped into place which can be removed at any time and screwed-in which is fixed.
iv. Follow-up and Maintenance
- The dentist advises regular dental visits and proper hygiene to maintain the health of the Q.1implants and surrounding tissues.
Frequently Asked Questions
Q: How long do different types of dental implants last?
A: Most dental implants, including endosteal and All-on-4, can last 15 to 25 years or longer with proper care. The longevity depends on the type of implant, oral hygiene, bone health, and lifestyle factors like smoking.
Q: Are dental implants safe and do they have any side effects?
A: Yes, dental implants are a safe and widely used procedure with high success rates. Like any surgery, minor side effects such as swelling, bruising, or discomfort may occur temporarily. Serious complications are rare when performed by a qualified dentist or oral surgeon.
Q: Do dental implants hurt?
A: Dental implants may cause mild pain or discomfort during and after the procedure, but it’s usually manageable with local anesthesia and pain medication.
Q: Who is a good candidate for dental implants?
A: A good candidate is someone with healthy gums, sufficient bone in the jaw, and no serious health conditions that affect healing. Non-smokers and individuals committed to maintaining good oral hygiene typically experience the best outcomes.
Q: How long does the dental implant process take from start to finish?
A: The full dental implant process usually takes 3 to 6 months, depending on healing time and whether bone grafting is required. Some modern techniques, like same-day implants, may shorten this timeline for eligible patients.
Q: How long do different types of dental implants last?
A: Most dental implants can last 15 to 25 years or longer with proper oral hygiene and regular dental checkups. Their longevity depends on the implant type, patient’s bone health, and lifestyle habits like smoking or teeth grinding.

